Let’s face it – the sun is not good for your car. It fades the paint, it dries and cracks the dashboard, and it yellows and damages the plastic bits along the exterior, including the plastic headlight lenses. Well, 3M has a product that helps reverse sun damage on headlight lenses by gently sanding away the damaged layer of plastic to restore a fresh surface that’s free of discoloration and scratches. 3M wanted me to try my hand at restoring my 2004 Chevrolet Trailblazer’s faded lights, so they sent me their heavy-duty restoration kit.
The all-inclusive headlight restoration kit came with everything I needed except for a household drill and microfiber rags. But since I’m at least halfway handy around the house and a self-respecting man, I already had both on hand. It also helps to have a spray bottle of water handy.
The kit comes with a step-by-step guide with full-color photos and tips. As for the actual hardware, it comes with three levels of sanding media, rubbing compound, a compound pad, a drill mount for the sand paper, and a finishing wax designed to protect the plastic from future discoloration. Oh, and before you tear your garage apart looking for masking tape like I did, the 3M kit includes that too.
So let’s dive into this weekend project to see what 3M’s headlight restoration kit is all about.
Continue reading for the full review.
The Before Shots


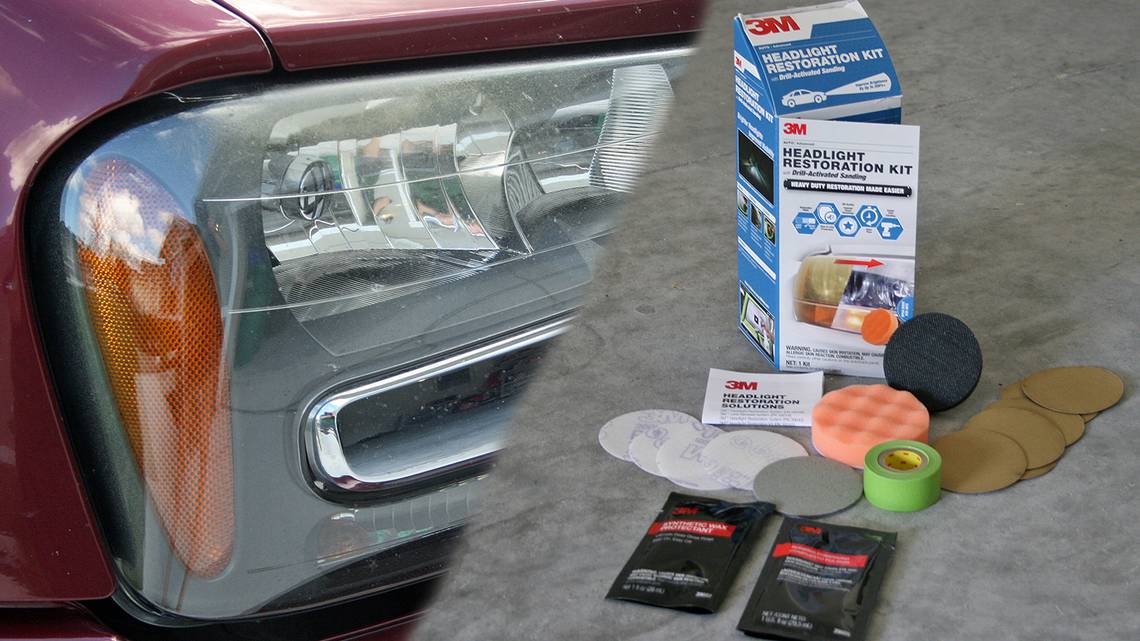
As you can see, my Trailblazer’s headlights were starting to show their age. Even though the SUV has been garage kept most of its life, the sun has still given the lights a yellowish cancer that’s rough to the touch. It also dulls the headlight’s beam, which in turn, makes nighttime driving not so safe.
Restoring your headlight lenses might be a better first step towards having brighter headlights than buying expensive HID aftermarket lights. Those tend to look cheese and blind oncoming traffic anyway.
What’s Included?

The full name of this 3M product is the Headlight Restoration Kit with Drill-Activated Sanding. This is the heavy-duty version for headlights with a significant amount of sun damage. 3M also makes a light-duty kit for cars needing a less intensive tough-up.
Crack open the box and you’ll find the following items:
- 1 Disc Pad holder for Household Drill
- 6 Gold Sanding Discs (500 grit)
- 4 White Finishing Discs (800 grit)
- 1 Trizact Gray Refining Disc (3,000 grit)
- 1 Tube of 3M Rubbing Compound
- 1 Compounding Pad
- 1 Roll of Automotive Masking Tape
- 1 Tube of 3M Synthetic Wax Protectant
You will need these items:
- A Power Drill (recommended rpm range of 1,200 to 1,600)
- Microfiber cleaning cloths
- A Spray Bottle with Water
Step One: Preparation

it’s important to have a clean surface to work with, so 3M recommends cleaning the headlights with automotive soap and water. Once dry, apply the green masking tape provided in the kit. It’s extremely important to double-layer the tape to protect the paint from sanding. As you can see from the photos, I was rather generous with the tape.
Step Two: Removing Yellowed Layer & Defects
Here comes the fun part. This step uses the coarsest sanding media, the gold colored 500-grit disc to remove the worst of the yellowed and scratched layer of plastic. There are six of these discs in the kit, so you can allot three for each headlight.
3M recommends holding the drill flat or at a slight angle to the headlight surface. This allows you to maintain control of the spinning disc. Excessive pressure isn’t needed. In fact, pressing too hard could heat up the plastic to the point it begins to warp. Not good. A moderate to light touch is all that’s needed. To sand, move the spinning gold disc at a steady pace back and forth over the lens. Wipe off the lens to inspect. Make sure the lens has an even coat of haze. At this point, the headlight will look dull and translucent. It’s fine; the next steps will make it shine.
Step Three: Reducing Sand Scratches
With the heavy sanding done, it’s time to move to the finer sanding media, the white, 800-grit disc. The process is much the same as with the previous disc – move back and forth over the headlight with an even pressure, making sure not to push too hard. Wipe the lens off with a cloth to prevent a build-up of material. Swap the white disc for a new one when it becomes clogged.
Step Four: The Trizact Disc

Much like the Trizact pad I used when removing scratches from the Trailblazer with 3M’s Scratch Removal Kit, the Trizact pad has a super-fine surface with 3,000-grit sanding media. This is what prepares the surface for compounding. This is also the step where the squirt bottle with water comes in.
Moisten the gray pad and the headlight, then with medium pressure, begin sanding the headlight back and forth. Mist the surface to keep it from drying out. 3M says many headlight lenses will begin to produce a white slurry residue that runs off with the excess water. This is good; it shows the sanding scratches are being reduced. The directions say to make four to six more passes over the lens when the slurry starts to form. Wipe the lens dry.
Step Five: Compounding

Now that the yellowed and damaged layer of the headlight lens has been sanded away, its time to begin preparing the surface for a crystal clear shine. The compounding cream works to restore the shine of the plastic lens back to a factory-fresh condition.
Using the thick orange pad, add a dime-sized dollop of rubbing compound to the disc. I found that dapping the compound onto the headlight surface helps prevent compound from flying everywhere. To use this pad, hold it flat against the lens surface. Run the drill and pad across the headlight, polishing it until the haze is gone. At this point, the headlight should look perfect. The yellow sun cancer and rough surface should now be a smooth, clear lens just like it was when new.
Step Six: Protecting The Lens

Now that the headlight lens looks factory fresh again, you’ve got to protect it. 3M provides a tube of synthetic wax that’s designed to guard the plastic headlight lens from future yellowing and sun damage. To apply, put a dime-sized dollop on a microfiber cloth and rub onto the lens. Fold the cloth or get a new microfiber cloth to remove the excess wax from the headlight lens.
Like your vehicle’s paint, the headlights need waxing too. 3M offers a larger container of this same headlight wax on its website. The part number is 39030. Should the lens show signs of yellowing in the future, the less aggressive lens restoration kit should do the trick. It’s called the 3M Quick Headlight Renewal (part number 39166).
My Thoughts

This isn’t my first time using a 3M restoration product on my Trailblazer. But unlike the paint scratch removal kit, the headlight restoration kit requires a bit more elbow grease. Where the paint kit requires the lightest of touches to use properly without swirling the paint, the plastic lenses on my headlights required a few more pounds of force behind the drill. Nothing major, but just enough to remove stubborn plastic rather than blending paint into a surface imperfection.
Nevertheless, the kit was just as easy to use. The directions were simple to follow and online videos allow visual learners (like me) to watch before they do. The kit works as advertised in removing the yellow discoloration from headlight lens and restoring them to a clear, bright finish. The only remaining test will be to see how long the bright finish lasts. I do plan on keeping the 3M Synthetic Wax applied on a regular basis.
As far as pricing, a quick search online showed costs averaging $20. That’s not bad when considering how clear headlight lenses can dramatically improve the appearance of a vehicle, increase its value, and restore the headlight’s effectiveness to illuminate a dark road.